Thursday, July 29, 2010

Washing fabric

I prefer to wash fabrics when they come in my door.  I use a short cycle--about 5 minute wash-- and get it over with and done.  I know other quilters who never wash because they like the crisp finish on the fabric.  My number one reason to wash is dye bleeding....one accidental bleed years ago convinced me of that.  I also use a dye catcher cloth when I wash finished quilts to hopefully stop that event from happening again. 
So, today I am washing fabrics.  The first load was a piece of white--about 6 yards long--that I was given several years ago and stuck away.  I pulled it out to use as a backing and knew it needed to be washed first.  Then the mail arrived.........yeah, I know I don't need anymore fabric, but 30 yards for $35 was too much to resist.  I threw out the stash busting scoreboard and bid and won 2 lots on ebay.  Justification:  all florals, mostly Hoffman's  and in large cuts that could be used for backings.  And I am a sucker for florals.  Here's a look.
Without a doubt I have the yardage now to do a french braid in floral fabrics,  a split 9 patch in floral fabrics, and lots more watercolor/colorwash quilts.  Better finish the washing, so I can press and fold and hunt for a place to stash this haul.  Happy stitching.

Wednesday, July 28, 2010

Borders done!

Finally!  I didn't get as much done this weekend as I had hoped on the  braid borders.  I  had to play around with the side border  quite a bit.     I added several fabrics in the braid to get the length.  And still it is not perfect, but then I don't allow the quilt police in my house.  But I love the overall effect.   Unfortunately I have bias on the edge....I stay-stitched around it all to try to avoid too much stretching.   So here's a partial photo before it gets pinned and quilted. 
  The process for the border---basic braid construction where one strip is added to triangle or square in this case, sew and flip and press, and then add the next strip to the adjoining side.  (For great  detail instructions, see quiltville.com.)   Using the light square as my center point, I added strips to one side of the square and then completed the other side.  I had "auditioned"  fabric and used the value viewer to determine value for placement.  I worked from light in the center to the darkest, then added a medium value and back to lightest fabric.  When I was satisfied with the blending, I wrote down a list.  This is important, because it is very easy to get distracted and then add a fabric out of sequence.  Then sew, and sew some more till done.  Press carefully to avoid stretching and stay stitch both edges after trimming to desired width. 
I think I need  a little "mindless" sewing after this one.  No more math and figuring sizes, no partial seams,  and no matching points for a  while. 
Happy stitching.

Sunday, July 25, 2010

Gift card covers

I was sorting out some files on the computer last night and ran across a save project from Connecting Threads website  for gift card covers.  How cute and quick to make!  I tried a couple and think I will make a few more for our guild boutique sale at the quilt show.  They are simply  2 fabrics fused and stitched together at the edges.  They would even work for business card keepers.
A great way to use up charm squares and scraps.
Have fun browsing thru the linked website for ideas.

Friday, July 23, 2010

AK quilt layout and plan B

My challenge was the layout because I had created blocks of different sizes.  And #2 challenge was how to set them together.  I realized I did not have enough of the fabric I intended to use.  I even searched on ebay for it, and ta-da!  No fabric but a booklet of an Alaskan sampler that had a great border treatment....I bid and won it for $2.  So plan B began to evolve. 
I further limited myself to size....I wanted to be able to hang this quilt in a certain spot and the size needed to be no more that 49 inches wide.  Length wasn't a problem.  After various tries that didn't work, I went back to basic design principles of balance and symmetry.  The two wide blocks were set in opposite corners, and the one long block went into the center.  Now it began to work together.     The other blocks just seemed to find their own spot.  An outer strip of the dark fabric is still to be added, but here's the layout.
The border is a braid strip that is shaded light to dark from the center of each side to the corner.  The sampler booklet uses 2 sets of chevron strips to create the border.  I decided to use a braid---since I  just finished a french braid quilt.  That was a huge help to figure the math required to determine the size of strips to use.  Part of the learning process.
InsightUse your experience from one project to the next project.  So far  I have one section about half done.  Guess I know what I will do this weekend. 

The process pledge

I stumbled across  The process pledge yesterday.  Yep, that is exactly what I have been trying to do with the blog.  It is to focus on the process and progress of what I do.  What inspires me,  how do I make color choices, and choose a layout for my designs, what emotions do I show,  successes and flops.  I have been working through the Art Quilt Workbook this year and learned from all the exercises and flops along the way.  And secondly, my insights list has been my way of  talking to myself about the process and the journey of learning.  
I love the intent of the pledge to put my thinking out there, even when it is not clear,  about the process and not  just the end product.    Maybe someone will  be inspired along the way---even from my mistakes.   And maybe I will remember not to make the same one over again.

Wednesday, July 21, 2010

Frayed french roses

This has been my  "easy sewing at night"  project for the summer.  The pattern is called "French Roses" and it is the one I saw while we were in St. Augustine earlier this year.  I changed up the pattern just a bit and added small squares on point where the blocks come together.  It is ready to be quilted and then washed.  The raw edges should fray and fluff up to soften the whole effect.  It is 45 inches by 55 inches.  A great lap size, but smaller blocks would make a wonderful baby quilt.
Here's a close up of one of the blocks.  Each layer is stitched  about 1/4 inch from the edge using a very small stitch.  After stitching each layer, you cut away the fabric underneath to keep a single layer of  the sewn fabric.  The technique is easy and could be adapted to a lot of patterns and styles of fabric. 
Off to work on the AK quilt, as I am ready to put the center together.
Happy stitching.

Monday, July 19, 2010

Final AK block--I think

I think this is the last block for my AK quilt.  It is Index Lake at Victory Camp.  I used several techniques in this one, and learned a lot.  
1) For the fused pieces, I used misty fuse because I wanted to do some thread painting on the trees.   It is a lighter fusible than the "paper backed" variety and so it is easier to stitch through and does not gum up your needle.  Plus I could work from the front of my design and did not have to reverse all the pieces.  It is more time consuming, but I am happy with the results.
2)  Drawing the entire block took a while.  I worked a rough sketch from a photo Deana took of the lake.  I had to eliminate a lot of details, or I would still be cutting, fusing, and stitching.  I decided on the size of the block and drew it on freezer paper.  Then I drew in the basic shapes and layout.  When I was satisfied with the sketch, I traced another one on freezer paper that I could cut part for the individual pieces.  The freezer paper pieces were then pressed to the right sides of the selected fabrics.
3)  Fabric selection to get the right values for the depth and perspective on the mountains and the shadowed area for the lake---which was frozen was important to me.  I used sun painted fabric  that I did last week for the sky. Value viewer helped and I even used the wrong side of a couple of pieces.
4)  Thread painting the trees to create the texture and branches was new for me.  Most of the thread painting that I have done has been on layers of tulle and solvy that were cut out and appliqued on.  For this I fused the trees trunk on and then did the stitching for the branches and down the sides and at the base of the trees. 
5)  Finally, I used prismacolor pencils in a few spots for highlights and shadows that I missed.
Now to decide the layout.  I had planned to use one fabric for the border and between the blocks, but I do not have enough of it.  I have searched the Internet and asked people and contacted shops in the area, but no luck.  So, I have gone to plan B.  I will use  the planned fabric for setting the blocks together.  For the border I will do a shaded braid strip....that's my next step. 
Insight:   I am so glad I did the Art Quilt Workbook projects.  I have used many of them in the blocks  for this quilt.  Thank you, Mona, for suggesting the group project.  Thank you, Elin and Jane, for writing the book.  Thank you to my project group for sticking with it. 
Insight:   Either buy larger amounts of fabric, or have a plan B.  There goes my stash busting plan and my budget!
Happy stitching.

Sunday, July 18, 2010

Artful project---sun painting

Just a short session doing some sun painting with setacolors last week.  It's the next chapter in Art Quilt Workbook.  I decided to see what would happen if I used solid color cotton that I had.
The top one on the right is painted on a purple solid.  A very subtle effect on this one. 
The top left is painted on a blue gray solid.
The bottom piece was done a light gray.  You can see the actual fabric color as a gray streak through the center.  It almost looks like a landscape, when I was just dabbing and dragging colors around. 
Over all the colors come out stronger and deeper when painting on colored fabric.   


One final piece painted on to white.  I did it in three sections.  Love the one on the right with the stems and leaves.  Middle one used some foam cut out shapes and some shadowing with paint.  I plan to use this section for my theme project.  The left section is leftovers....just randomly brushed on paint that was leftover...and then crinkled up just a bit to create some streaks. 
Ok, now that I see what I have, I plan to try some more this week, if I can stand the heat. 
I worked on another block for the AK quilt.  It is based on a photo Deana took of Index Lake.  I need to finish up the thread painting on it, but it is looking really good.  Think this quilt is about ready to come together.

Wednesday, July 14, 2010

Art project = poster project

What's a poster project?  It's a type of art project and the object is to turn a favorite poster into a fabric interpretation of it.   It's a type of round robin where you select a poster you like, and cut it into sections.   Choose one section and  reproduce it in fabric.  Place everything in a box.  Then the next month you pass the entire  box to the next person to do a section.   When everyone has done their section, it comes back to you to assemble and complete.  Here's mine from 2 years ago.  Mine was cut into 4 sections.  I think it turned out great.
So at bee Friday night, Shelia had her pieces for the poster project from 2 years ago on her design wall.  All the sections  looked great except for one.  Unfortunately the person did not understand what or how to complete her section and she photocopied the poster section onto fabric.  It stood out like a glaring headlight.  Shelia is such a great gal and does beautiful work,  so I kind of offered--really insisited-- that I would like to try and re-do that section.  Here's the section of the actual poster I had to reproduce in fabric.
And here's what I completed--with a generous 3/8 inch seam allowance that she can trim to match the other pieces.  I greens that I used were some of the sun painted fabrics from last year.  I think they were perfect for this project.  It's a neat project, and lets you use up some stash and be a bit creative.
BTW, Shelia loved the result!
It's so hot here right now, but I think it would be a great time to do some sun painted fabric.  I have been drooling over some of the fabrics Delia has done.   I may play with the paints some tomorrow and see what I come up with. 
Happy stitching.

Tuesday, July 13, 2010

Slick Tip

I started quilting on the 2 watercolors and whoa.......the first one almost got away from me!  The machine bed is so slick and the fabric just glides over it with no drag.  I usually use a supreme slider but often I still have drag on the quilt sandwich in the table area.  So Russ went a little crazy and waxed the  machine bed and table with a paste wax that he picked up for his workshop table last week.   It really works.  Try Meguiar's  Paste Wax---you can find it in the automotive section at Walmart.
Blog2print blog book arrived, and I love it.  And here's a coupon code for a 15% discount good thru July 31, 2010, that came with it to share...... if anyone is interested in having blog printed.  Code is B2PCC610.

Sunday, July 11, 2010

New projects ready to quilt

I am so pleased with both of these watercolors for the online class.  I can't decide which I like best.   They just need to get quilted this week.
The first photo is with the dragonflies.   They are thread painted on tulle and the wings look so good.   The stems/leaves were inspired by a photo in a magazine and are cut free-hand  and fused down.  I sort of twisted the fabric as I fused to get a gentle curve to the longer stems.  I named  it Renewal. 


The second photo is Persistence, again named for the goldfinch. 
A little reading on the goldfinch and I discovered it is a symbol for persistence and endurance.  All that time they spend hunting and eating the tiny thistle seeds.  I found a photo of a goldfinch in a stack of pages saved from old calendars.   I thread painted the goldfinch on peltex and the branch on  layers of tulle.  Actually the branch is two pieces because the first part was too short to reach the edge,  and then I joined them with more stitches.  The entire accent was then stitched to the wall hanging.   I added a filet inset of yellow to make the whole thing pop. 
I finished off the written class instructions and only need the do the quilting and take final photos.  Yea!
Insight:  Thread painting takes practice, just like free motion quilting.  I have greatly improved. 
Insight:   Creating a watercolor makes me happy.  Do what you love.
I am finishing up a section of a poster project that I snatched from Shelia on Friday night.  So that will be my art project this week, but I can't post a photo until I give it to her Tuesday night.  Because she would peek at the blog, I know she would!  I will explain the poster project then too.  
Happy stitching.

Friday, July 9, 2010

Sneak Peek

Here's a peek at  the "blue darter" dragonflies that I thread painted.  I used 2 layers of tulle between layers of solvy stablizer.  They turned out just the right size for the wallhanging too.  I used sulky and rayon threads for a slight  sheen.  Looks great, especially for the wings.  I found a photo in a garden magazine to use as inspiration for the leaves. 
 A few more photos to take as I work for the class instructions and I can put it all together----finally.  It's a long process to develop a project and put together written instructions with photos.  I have been working on this off and on for over  2 months, so I am ready to get it done.  That's the "producer" side of me :).
  I got an email from Blog2Print that my book is on its way!  Yea....I had 2009 blog entries printed in one volume and can't wait to get it.  If I am happy with  it, I will do the first half of this year, too.
Insight:  I wanted to be a journalist....why did I wait so long?

Thursday, July 8, 2010

Research leads to inspiration

I call it research, but it is really searching the Internet.  Object of search---an eagle--preferably a simple design for another block for my AK quilt.  A few hits and misses and then I found one free-quilt-patterns.net that was just about right.  Along  the way I spotted a dragonfly that I really liked too....hmmmm.
I used a birds in the air block for the background for the eagle perched on a branch.  This one went together really quickly---guess I have done enough fusing and applique for this quilt that I should have the technique figured out. 
And the entire time I am working on the eagle, I kept  musing about the dragonfly and other unfinished projects to complete.  I was sure  that was a pattern I needed for something.  Later going to get the mail, I noticed a couple of dragonflies on the lavender by the drive.  Aha!  I  could use the dragonfly as the accent on the watercolor wall hanging for the class  I will be teaching.
 So back to computer to look for actual images of dragonflies.    I needed a fairly small size and yet large enough to thread paint.  There are some wonderful sites devoted entirely to dragonflies....who knew?   And they come in all kinds of colors and shapes.  I picked  a photo of a blue darter and  zoomed in to trace the shape.  I also discovered that dragonflies are a symbol of renewal and the positive life forces.   I love it----I have a name for the wall hanging now.  
InsightEvery time inspiration hits, it hits me by surprise.   I never know where it comes from, or when it will arrive.   Sometimes I am at my highest, and other times at my lowest.  My mind--that  tangle of crossed wires and such--processes things I have seen, heard, felt, and dreamed to compose a single beautiful idea to express who I am.    Where do others get their inspiration, their vision?   Probably the same way I do, it just took me a long time to understand. 
So.............Off to do some thread painting.  Sneak peek tomorrow.  Happy stitching.

Monday, July 5, 2010

The inspired block

I haven't accomplished a lot this past week, as I am having a lot of pain from tendonitis.  Hopefully by taking a break from sewing and yard work I can get past it.  So no major art project again this week, just a single block I wanted to do.
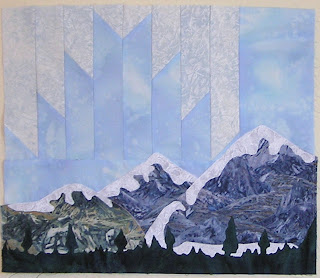
A few days ago I mentioned inspiration from the delectable mountain block for my AK quilt.

Here's what I came up with for the block of the Matanuska Glacier view.   It's about 15 inches by 12 inches overall.     I like the effect of the block versus the applique.  Fused and machine appliqued, I should say.  I just free hand cut the snow and the tree line for the foreground.   I will probably do a couple more of this type for the AK quilt.
Till then, happy stitches.
Related Posts Plugin for WordPress, Blogger...